|
Creating a Report for a View |

  
|
|
Creating a Report for a View |
|
Follow the example steps below to create a new report:
| 1. | In the Starters Views page of the Race Data form, switch to the Course Performance view. |
| 2. | Click on Print button on the RaceMate Toolbar. |

The Report List will appear and the report for the current view is highlighted.
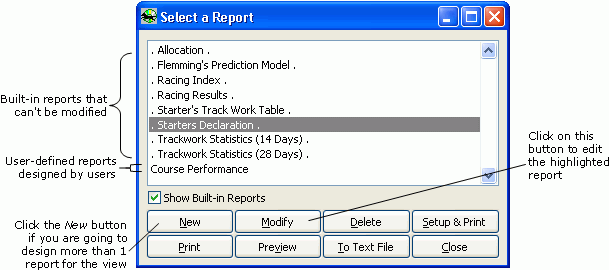
In the list, you can see two types of reports: Built-In Reports (names begin with a ".") and User-Defined Reports. Built-In Reports come with RaceMate and cannot be modified. User-Defined Reports must be designed by users before they can be used.
| 3. | Click on the Modify button to show the report designer so that you can prepare the report for use. (Please note that if you click on the Preview button instead of the Modify button, the report designer will be show as well because a user-defined report must be edited at least once before it can be printed or previewed.) In the RaceMate report designer shown in the following figure, a Column Preview Table is at the upper part. The table gives you handy information about: |
| • | Column width |
| • | Gap width between columns |
| • | Total column width |
| • | Column heading |
At the left of the designer, under the Column Preview Table, a Column Information list box is found. Click on Horse in the list to highlight the column. Attributes of the column are show in the Column Attributes Edit Area.
| 4. | Change the width of the Horse column to 6 cm by clicking on the Width Spinner. At the same the, you will see the width of the Horse column changes in the Column Preview Table and the value of the Remaining width changes. |
Note: If the Remaining width drops to zero, the report columns just occupy the whole report width (excluding the left and right margins)
| 5. | Click on Save+Exit to close the Report Designer and return back to the Select a Report dialog. |
Page url: http://www.racematenet.com/english/help/index.html?creating_a_report_for_a_view.htm